Appearance
Troubleshooting
Having Trouble Logging into Nanome?
These ports are REQUIRED from each machine/VR device:
- (Authentication) TCP Port 443 to DNS api.nanome.ai
- (Collaboration) UDP Ports 5055-5056 to DNS collaboration.nanome.ai, collaboration-us-east.nanome.ai, and collaboration-us-west.nanome.ai
- (Plugins) TCP Port 8888 to DNS plugins.nanome.ai
These ports are OPTIONAL from each machine/VR device
(Molecular Databases)
- TCP 443 to DNS files.rcsb.org
- TCP 443 to DNS pubchem.ncbi.nlm.nih.gov
- TCP 443 to DNS www.drugbank.ca
If you are unable to get the Steam or Oculus applications to work regardless of Nanome, try opening these ports from each device:
Oculus (according to their documentation)
TCP port 80 & 443 for
- oculus.com
- facebook.com
- fbcdn.net
- akamaihd.net
They also recommend TCP 3478 and UDP 500000-59999 to each of the above sites, but the drivers tend to work without them.
Oculus for Business Only:
TCP Port 443 for:
- graph.oculus.com
- graph.facebook-hardware.com
- graph.facebook.com
- mqtt.facebook.com
- my.workplace.com
Steam and SteamVR (according to their documentation)
TCP port 80 & 443 for
- steampowered.com
- steamcommunity.com
- steamgames.com
- steamusercontent.com
- steamcontent.com
- steamstatic.com
- akamaihd.net
They also recommend opening network traffic to the Steam application for UDP Ports 27015-27030 and TCP Ports 27015-27030
Tips to use your Oculus Quest in a VPN network
New Method
The Oculus Quest 2 with the v29 firmware update from Oculus enables the use of arbitrary APK files (Android apps) to be used on the device. This means that you can sideload / install the APK file of your favorite VPN to the device, log in, and use as if you would for an Android device. Note that your VPN provider must offer an APK for this to work. We have seen it work properly with NordVPN, ExpressVPN, Cisco AnyConnect, and several others.
Old method
Method 1: VPN-enabled Hotspot from a Windows 10 PC Requirements:
- An existing organizational VPN and VPN software on your PC
- Admin access to your Windows 10 PC
- Have VPN Credentials on hand
- Validate your Wireless card can support this! https://www.quora.com/How-do-i-know-if-i-have-Qualcomm-Atheros-wireless-card
Once all requirements are met, follow these steps to create a VPN-enabled hotspot:
Step 1: Open your VPN Software, Enter your credentials, and connect to your VPN
Verify you have an internet connection through the VPN and check your IP address to validate it changed and note the location/IP for later (https://whatismyipaddress.com/)
Step 2: Hit Windows Key + type Mobile Hotspot
Open Mobile Hotspot and change your wifi name and password then turn on the hotspot
Step 3: Open your Control Panel > Network and Internet > Network and Sharing Center > Change adapter settings.
Step 4. Identify which connection is your Ethernet # with the indicator "Unidentified Network, TAP-<VPNType> Windows Adapter
Step 5: Right click it and go to the Sharing tab
Step 6: Check allow sharing for other users in the network. From the dropdown, select your mobile hotspot connection "Local Area Connection #". It should be labeled as WiFi Direct Virtual Adapter
Step 7: Join the Mobile Hotspot Wifi from your Oculus Quest
Step 8: Verify you have the VPN applied by checking your IP/location (https://whatismyipaddress.com/)
Step 9: Launch and enjoy Nanome behind your firewall!
Oculus for Business FAQ https://developer.oculus.com/documentation/ofb/latest/concepts/ofb-developer-reference/
Allow Nanome through firewall
1. In the Start menu click Settings, and then enter Firewall in the Find a Setting search box.
2. Click Windows Firewall in the search results. In the resulting Windows Firewall window, click Allow an App or Feature through Windows Firewall.
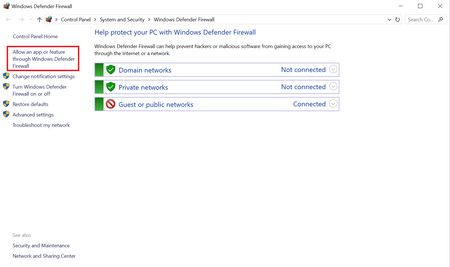
3. In the Allowed Apps window that appears, click the Change Settings button, and then select the check box for Nanome.
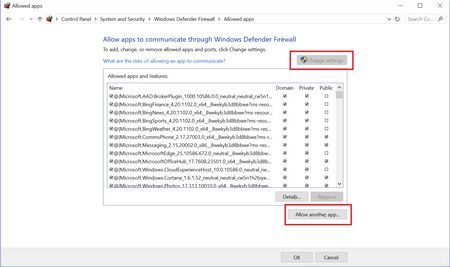
If you can't find Nanome in this list, click the Allow another app button, and type in the path to Nanome.exe or click the Browse button and select it.
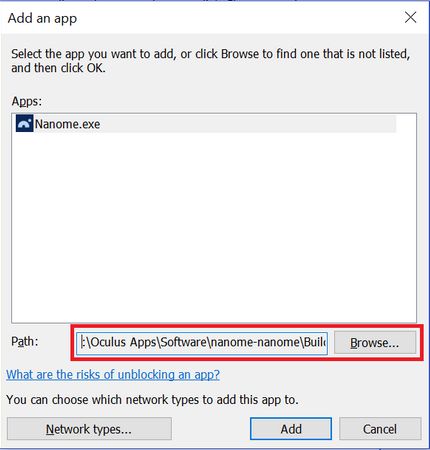
Find Nanome.exe if you installed Nanome using Oculus


If you installed Nanome using Oculus, click on the three dots button and click Details. You can find the location of Nanome to the right.
Find Nanome.exe if you installed Nanome using Steam
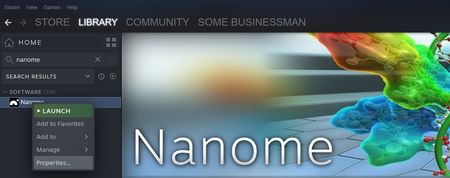
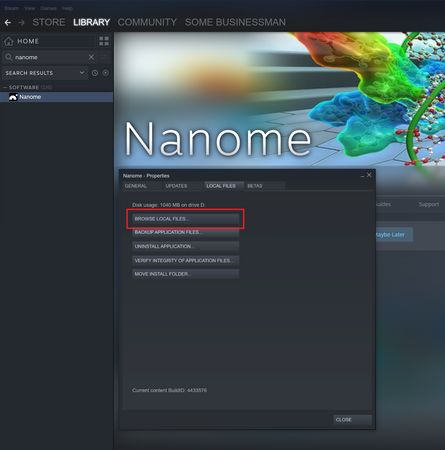
If you installed Nanome using Steam, right click on Nanome in the library and click Properties. Select Local Files tab and click Browse Local Files to open the folder containing Nanome.
4. Click OK and then click the Close button to close the Windows Firewall window.
Having Trouble Hearing Anything?
Windows Audio Troubleshooting
Oculus Audio Troubleshooting
Vive Audio Troubleshooting
Nanome Audio Troubleshooting
My Windows and Oculus audio are working, but I can't hear anything in Nanome